AWS (First Lesson 4/24) Hacks
This blog includes all of the hacks for the very first lesson (AWS) for Period 4 Yeung.
KASM Hacks
(1) In 3-4 sentences, please explain the significance of virtual desktops and KASM. How can virtual desktops such as these be utilized in our AP CSP environment? (0.45)
KASM Workspaces essentially allows us to stream applications from containers (for our class, Docker containers with the “make server” command). KASM is very versatile in terms of its functionality, as you can get access desktop access in a small amount of time from any device and anywhere around the world. Furthermore, KASM has many advantages to its functionality, one being that it is very scalable. Another great thing about KASM is that it is very easy to access, as the web browser that you log in from doesn’t matter and whatever you are deploying can be hosted anywhere. Another perk of KASM, which is probably the most important, is that it has very well-managed security, with 2 factor authentication (2FA), security groups, logging, and web filtering. Overall, KASM Workspaces has many great functionalities and is definitely a very efficient way of hosting applications, especially for a class like CSP.
(2) Attempt to work through the KASM setup with your team. Attach two screenshots to show that you have successfully gone through the setup: The first screenshot of KASM generating your credentials, and the second screenshot of the KASM workspace once you have logged in. (0.45)
Attempt at doing the KASM setup process:

AWS Databases Hacks
Quiz 1 Questions and Answers:
Which of the following is not an AWS database option?
A. Amazon RDS
B. Amazon Neptune
C. SQLite
D. Amazon DynamoDB
Answer: C
Which of the following is a file-based, lightweight RDBMS?
A. Amazon RDS
B. Amazon Neptune
C Amazon DynamoDB
D. SQLite
Answer: D
Which AWS service enables you to store and query highly connected datasets?
A. Amazon Relational Database Service (RDS)
B. Amazon DynamoDB
C. Amazon Neptune
D. Amazon DocumentDB
Answer: C
Answers: C,D,C
Quiz 2 Questions and Answers:
What is the main difference between relational and non-relational databases?
A. Relational databases are only used for structured data, while non-relational databases are only used for unstructured data.
B. Relational databases can easily handle high data volumes, while non-relational databases cannot.
C. Relational databases are based on tables and use SQL, while non-relational databases are based on collections and use JSON-like documents.
D. Relational databases are more expensive than non-relational databases.
Answer: C
Which AWS database service is best suited for applications that require low-latency speed?
A. Amazon ElastiCache
B. Amazon Neptune
C. Amazon DocumentDB
D. Amazon RDS
Answer: A
What is the purpose of the code example provided in the lesson?
A. To demonstrate how to create a table in Amazon Aurora.
B. To show how to query data from a DynamoDB table.
C. To provide an example of how to connect to a database instance in RDS using Python.
D. To showcase how to insert data into a MySQL table.
Answer: C
Answers: C,A,C
DuckDNS and AWS Hacks
HACK 1: Create a diagram (Canva). What are the pros and cons of using DuckDNS? Show a diagram of an application running on AWS using a DuckDNS system.
Pros of using DuckDNS:
- It’s a free domain service that allows users to assign a domain name specific to their website
- It allows us to access a device or service using a static hostname, which is far more convenient
- It uses HTTPS encryption to protect user data.
- It can be used to create custom domain names for your network.
Cons of using DuckDNS:
- Relies on the stability of your internet connection, so if connection drops, one cannot access their network remotely
- It may not be suitable for larger or more complex networks or devices that require more advanced features
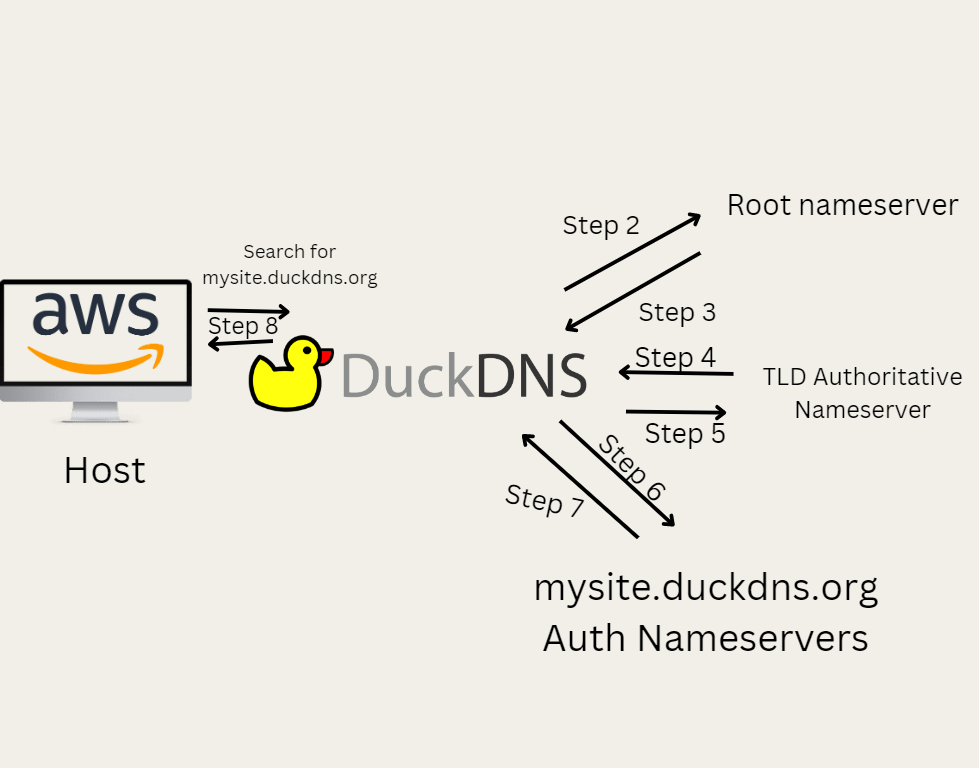
HACK 2: Write a reflection. Why do we use DNS? How does DuckDNS work? What makes DuckDNS unique? How is DuckDNS useful for our projects? What are the steps to setup DuckDNS?
DuckDNS is a free dynamic DNS service that allows users to assign a domain name to a dynamic IP address It works by automatically updating the DNS records for a custom domain name that one chooses, such as “mywebsite.duckdns.org”, with the current IP address of their home network. This means that even if one’s ISP assigns their IP address, they can still access their home network using the same domain name. DuckDNS is unique in that it is a free and easy-to-use service and can be used to create custom domain names for your network, which sharply contrasts with other DNS services such as Freenom, which requires people to pay money at times. It’s useful for projects that require remote access to a home network, such as running a personal web server (i.e. our Flask Python Web Application) or accessing home automation devices. To set up DuckDNS, you need to…
(1) Sign in with your DuckDNS account by selecting “Sign in with Github” (2) Creating a subdomain by entering a unique name and clicking the “add domain” button (3) Under “current ip”, change the IP address into the IP address that you would like to access (ex. the public IP address on the class EC2 instance) (4) After entering the IP address to be whatever you want, click the “update ip” button to confirm the change (5) Now you can use your unique DuckDNS subdomain to access your web application from the Internet!
HACK 4: In 2-3 complete sentences, talk about any outdated Nginx/Docker functionalities that may need to be addressed or any confusions you may have in regards to the deployment process from Trimesters 1 and 2.
While I currently do not have any confusions in regards to the deployment process from Trimesters 1 and 2 (as someone who did it both trimesters), I do remember some things that were especially confusing to me as I was learning about it and making progress on it over time. For example, I would have a difficult time understanding the difference between the nginx sites-enabled directory and the nginx sites-available directory, and I used to think that they were just the same file contents but with a different file name, so I assumed that the steps could be applied to either file. However, I learned that this was not the case the hard way, as our web application ended up not working and I had to redo the entire deployment process from scratch. Another thing that was especially confusing to me was that sometimes, in the nginx directories, there would be files that had a red colored font to them, and they would appear over and over again even after deleting them each time. This was obviously due to the fact that everyone was using the same EC2 instance, so as other groups were working on the deployment process, the red file would end up showing up for all of the groups.
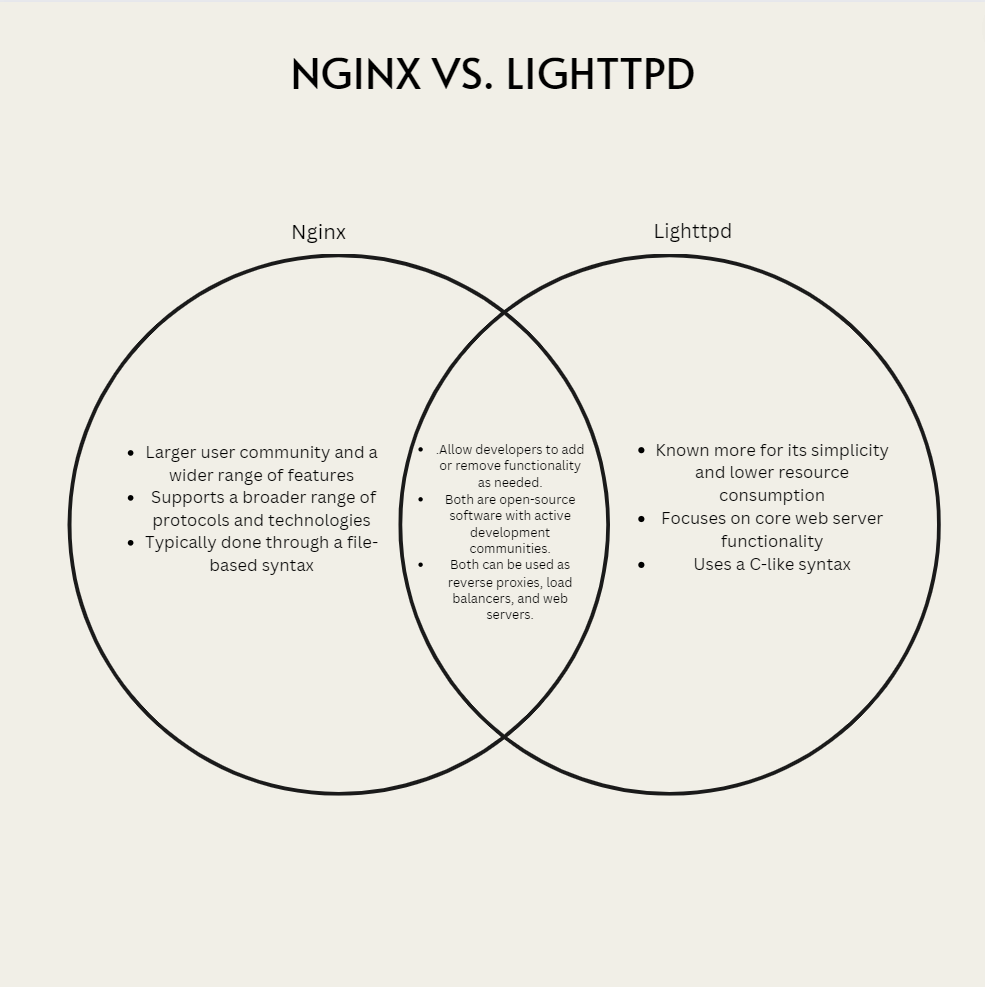
HACK 5: Create a Venn Diagram comparing Nginx with Lighttpd.
HACK 6: Complete the Python quiz and attach your output from the notebook (should be done once you do the quiz.)
Below is the output of the quiz:
Hello, emaad running /home/emaad/anaconda3/bin/python
You will be asked 11 questions.
Are you ready to take a test! Press Enter key to begin. Best of luck :)
Question 1 : What does Domain Name Server represent?
DNS is correct! Good Job!
Question 2 : What does this Represent: Amazon Web Services, which is a cloud computing platform provided by Amazon.
AWS is correct! Good Job!
Question 3 : What is the first Step to setting up an AWS Server? 1: Connecting to a Ubuntu EC2 Instance, 2: Start updating the system, 3: Clone the repository which one wishes to deploy, 4: Run the command: main.py to start the project
1 is correct! Good Job!
Question 4 : What is the third Step to setting up an AWS Server? 1: Connecting to a Ubuntu EC2 Instance, 2: Start updating the system, 3: Clone the repository which one wishes to deploy, 4: Run the command: main.py to start the project
3 is correct! Good Job!
Question 5 : What is the fourth Step to setting up an AWS Server? 1: Connecting to a Ubuntu EC2 Instance, 2: Start updating the system, 3: Clone the repository which one wishes to deploy, 4: Run the command: main.py to start the project
4 is correct! Good Job!
Question 6 : What is the second Step to setting up an AWS Server? 1: Connecting to a Ubuntu EC2 Instance, 2: Start updating the system, 3: Clone the repository which one wishes to deploy, 4: Run the command: main.py to start the project
2 is correct! Good Job!
Question 7 : What files are you supposed to edit after finishing the first steps of setting up the server and cloning it within the AWS Server? 1: Edit the docker files and docker.yml, 2: Edit the main.py file to change the characteristcs.
1 is correct! Good Job!
Question 8 : What is the first step to setting up a DuckDNS Server? 1: Sign in with your DuckDNS account using Github, 2: Configure current ip to the IP address that you want to access and click update ip button , 3: Create the subdomain, 4: Access site by typing in subdomain.duckdns.org
1 is correct! Good Job!
Question 9 : What is the second step to setting up a DuckDNS Server? 1: Sign in with your DuckDNS account using Github, 2: Configure current ip to the IP address that you want to access and click update ip button , 3: Create the subdomain, 4: Access site by typing in subdomain.duckdns.org
3 is correct! Good Job!
Question 10 : What is the third step to setting up a DuckDNS Server? 1: Sign in with your DuckDNS account using Github, 2: Configure current ip to the IP address that you want to access and click update ip button , 3: Create the subdomain, 4: Access site by typing in subdomain.duckdns.org
2 is correct! Good Job!
Question 11 : What is the fourth step to setting up a DuckDNS Server? 1: Sign in with your DuckDNS account using Github, 2: Configure current ip to the IP address that you want to access and click update ip button , 3: Create the subdomain, 4: Access site by typing in subdomain.duckdns.org
4 is correct! Good Job!
emaad you scored 11/11
Total Percentage: 100.00%
Certbot Hacks
(1) Follow the instructions below and provide a full screenshot of all terminal commands after and including sudo certbot –apache all the way until it asks for the domain you want to secure. At this point you can take a screenshot and cancel the process. If you choose to continue the setup process and get Certbot fully working and show a before and after screenshot of your domain with http amd https connection we will grant extra credit points on hacks, or make up for lost points in other areas.
Attempt at getting it to work:

(2) Research and compare the security features of OpenSSL and LibreSSL, and write about the recent vulnerabilities within it. Write about your research in a fastpages blog post. It can be the same post that has your screenshot for the Certbot Hacks.
OpenSSL and LibreSSL are both open-source implementations of the SSL and TLS protocols, which are used to encrypt and secure data communications over the internet.
OpenSSL:
- Supports a wide range of cryptographic algorithms, including AES, RSA, and SHA
- Has a robust security audit process and is regularly updated to address any security issues found
- Offers a variety of security options, such as secure random number generation, certificate validation, and OCSP stapling
LibreSSL:
- Created in response to a number of security issues found in OpenSSL in 2014
- Strives to be a more secure and reliable version of OpenSSL, with a focus on removing old code
- Offers improved security features, such as memory allocation hardening, safer curve selection, and a stricter codebase
While OpenSSL and LibreSSL have their very fascinating and important security features, they have both have recently had their share of vulnerabilities.
For example, with OpenSSL 3.0-3.0.6 (released in September 2021), two quite recent vulnerabilities that have erupted are the CVE-2022-3786 and CVE-2022-3602 vulnerabilities that involve email address buffer overflow and forces users to upgrade to OpenSSL 3.0. One very recent vulnerability in the LibreSSL took place a few weeks ago, called CVE-2022-48437. According to the description of the vulnerability, it entailed “[a]n issue” that “was discovered in x509/x509_verify.c in LibreSSL before 3.6.1, and in OpenBSD before 7.2 errata 001. x509_verify_ctx_add_chain does not store errors that occur during leaf certificate verification, and therefore an incorrect error is returned. This behavior occurs when there is an installed verification callback that instructs the verifier to continue upon detecting an invalid certificate.”
In summary, OpenSSL and LibreSSL are both widely used and respected implementations of SSL/TLS protocols, offering a range of security features to protect data communications. However, like any software, they are not 100% immune to vulnerabilities despite these security measures, and it is important to stay up to date with the latest security updates to ensure the safe use of computer systems in our daily lives.